

Hi! Today's Basic Training is this cute "ribbon rosette". We all have a bunch of ribbon just waiting to be used! These rosettes are super easy to make, and can be such a cute element on any page!
To get started, you will need:
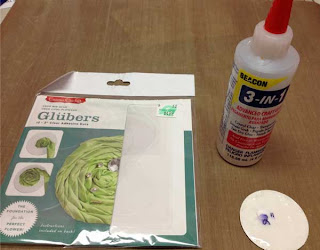
- Cardstock (any color or scrap will do, it will be covered up)
- Circle punch (I used a 2" circle punch for mine, but any size would work)
- Glue (I use Beacon 3-in-1)
- Scissors
- 24" your choice of ribbon - colored on both sides - (some of my ribbon is colored on one side and white on the other )
I purchased these glubers at Hobby Lobby and paid $4.99 for a package of 12. They are Clear adhesive dots, that are sticky on both sides. They are easy to use, however, pretty costly. Instead, I use my circle punch and glue! :)
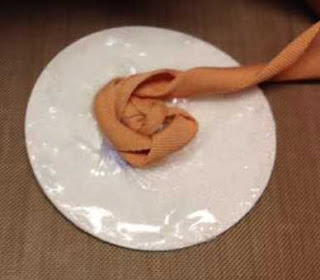
1. Punch your circle and coat the top with your glue. I let mine set for a little bit to get a tad dry and tacky.
2. Tie a knot on the end of your ribbon, and push onto the center of your circle.

3. Twist and press the ribbon onto the circle. Keep doing this until you reach the edge.


Voila! You're done, and you have a beautiful rosette to put on your page! You can also add buttons or bling to the center. I added a pearl to the center of mine.

Here is my layout with my newly created rosette:

We would love to see the rosettes that you have made! Submit a project showcasing your rosette, for a chance at becoming our featured S.W.A.T. girl. One winner will be chosen from all of the entries. Be sure and link up your project using Mr. Linky. Have fun!
~Melinda

Excellent use for my huge ribbon stash, thanks Melinda!
ReplyDeleteMy ribbon tends to languish unused and my Glubers forgotten. Thanks for the reminder! Off to make a rosette!!
ReplyDeleteI love this idea... I was wondering what fun stuff I could do with all my ribbon cause "bow maker" is not in my cards... I could be a flower maker. Thank you so much for sharing this with us.
ReplyDeleteThis was so great and you made it sound so easy! I made two small ones this morning and used them on my latest layout...it seemed to be missing something and these were just perfect! thank you so much!
ReplyDeleteI can't wait to give this a try! I love the look and low profile of these!!
ReplyDeleteGreat tutorial, i always wanted to know how to use this and now i will give it a try. thanks Melinda!
ReplyDeleteSo fun :) thanks for sharing!
ReplyDeletelove these and don't make them often enough. fab post and can't wait to see all that play along this month.
ReplyDeletethanks for the tutorial! awesome!!
ReplyDeleteI really love these tutorial!because of you i learn so much more how to make ribbon rosette...thank you...
ReplyDelete