Friday, August 30, 2013

Happy Birthday Alison!


Hi everyone!

Alison Day here to say that I am turning 40 (gulp!) at the end of September and celebrating with my fans on my blog. There will be GIVEAWAYS (so far I'm up to 8 separate giveaways ... and counting!), FREE DOWNLOADS for subscribers (printables, Silhouette cut files and anything else I can think of), tons of tips, tutorials and technique videos PLUS coupon codes from some of my favourite people. Oh, and lots of newly created projects to inspire you.

How do you get in on this party? It's really simple. Just click on link below the picture, enter your name and email address and then get your party hat on, 'cus you're invited!!


Click HERE to RSVP
 
The fun starts Saturday August 31st. See you there!

Saturday, August 24, 2013

Special Ops:Fan-iversary Card

 Endless Love

We all have that amazing couple in our life. The one that's deeply in love, thinks the world of each other, and has everything they could ever want. How do you celebrate their special day?
With an anniversary card as incredible as they are.

 
This month's Special Ops assignment is a fully operable paper fan.
 
Supplies:
12x12 sheet of patterned cardstock
1 yard of twine
1 extra-length brad
yarn needle
Paper Trimmer
Paper Piercer
Border Punch
 
Directions:
Step 1. Cut 12 x 12 sheet of cardstock in half. Punch length of the paper with border punch.
Step 2. Cut punched paper into 1 x 6 inch strips. Use a corner rounder on the ends of the strips. This will make 12 ribs.
Step 3. Cut 2 strips of paper, 1.25 x 6.5 inches. Punch the tops with border punch and the ends with a corner rounder. This will make 2 guards. 
Step 3. Pierce a hole 1/4 inch from the end of the rib, at the center of the paper. Pierce a second hole 4 inches from the end and 1/4 inch from the left side of the rib. Pierce a third hole 1/4 inch down from the second hole. Use the first pierced rib as a guide for all the ribs to be sure the holes line up exactly.
Step 4. Pierce a hole 3/4 inch from the end of the guard, at the center of the paper. Lay the first pierced rib over the guard, line up the center, end holes. Pierce the top two holes using the rib as a guide.
Step 5. Stack the strips of paper so the holes line up and the ribs are sandwiched between the guards. Feed all the strips onto a brad and secure. 


Step 6. Tie a knot in the end of the twine. Beginning with the last guard string the twine through the two upper holes 2 times.
Step 7. Lay the first rib against the last guard so that the edges over lap just a little. String the twine through the two upper holes 2 times. Over-lap the next rib and repeat with twine. Knot the twine after the final guard has been stitiched onto the fan.
Step 8. Decorate the top fan guard. Add sentiment to the fan ribs.
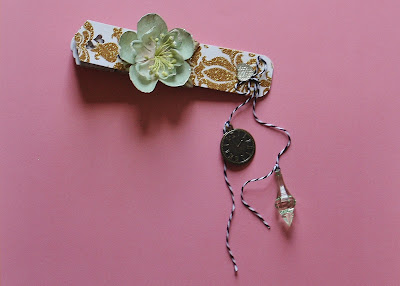
Please check my blog Scrappin Chaos for a list of supplies used.
 
Scrap On!
 
~Charity~

Saturday, August 17, 2013

Drill# 14

Drill #14 
Sketchy Sticker Saturday!

Welcome to another Sketchy Saturday here at S.W.A.T. This week we have brought in an amazing Guest Sketch Designer to share one of her sketches with us. Without further ado lets meet our Guest Designer:

I'm Jenn Campbell, wife, mother of 2, 2nd grade teacher, Stampin' Up demonstrator.  I have been crafting all my life!  I began with counted cross stitch and painting ceramics with my mom!  In college, I began scrapbooking to preserve my memories!  I became a Stampin' Up demonstrator in January 2010 and was the proud recipient of the #5 Rising Star Award in 2011.  I am so excited to be here create a sketch that hopefully inspires you! You can follow my adventures on my blog!


Now that you have the sketch lets get to the challenge! For this weeks twist we are challenging you to dig deep into that stash and find & use the stickers!! Not alphas, we are talking about those super cute stickers that you just had to buy!

to get you motivated we hare offering up a $10 Gift Card to 3 Scrappy Boys and a Guest design spot for next months Sketchy Saturday!!


And don't worry the S.W.A.T. Team has been hard at work to make sure you have plenty of inspiration!


\


Becci


Alison

Lisa

Well now its your turn! make sure you link up your project by the 28th for your chance to win! 

Saturday, August 10, 2013

August Basic Training

Welcome to August Basic Training!
 
Altered Chipboard
 
I love adding texture and layers to my projects and chipboard is my one-stop choice for this maneuver. I have a bunch of chipboard that comes in great shapes, but the patterns do NOT make me happy. Here is what I did to remedy this situation.
 
 
Directions:
1.My chipboard didn't match and wasn't in colors complimentary to my layout.
2.I sanded the stop with a nail buffer so the paint would stick.
3.After 3 thick coats of acrylic paint I left the chipboard to dry.
4.I used dye ink and a paislee stamp to decorate the chipboard.
 
Check my blog, Scrappin' Chaos for a list of supplies used.
 
Scrap On!
 
~charity~


Saturday, August 3, 2013

Drill # 13

Drill # 13
Trendy Triangles!


Isosceles, Scalene & Equilateral! Bet you never thought they would be trendy! But Triangles really are one of the hottest trends taking over the scrappy world! 

So that's Drill #13 we  challenge you to show us your triangles anywhere anyhow with paper, with a mask draw them yourself it all works here! But make sure you do because one lucky contestant will win a $20 gift card to 3 Scrappy Boys!


As always the S.W.A.T Team has supplied 
you with some amazing inspiration to get you started!

Bev


One lucky winner will receive a  $20 Gift card to 3 Scrappy Boys! So don't delay start working on your Triangles today! All projects must be linked up on right had side of the blog  by August 28th @ 11:59PM EST. 

If you missed last weeks winners click (Here)

Friday, August 2, 2013

Winner Winner Here are July's Winners!

Once again its time to celebrate the winners!

As always before that we want to thank everyone who entered the Drills and took part in the Basic Training and our first ever Blog Hop!
 We spend a lot of time going through each and every entry, and were so impressed and with the submissions!

We hope that you will join us again or August!

But first, let's celebrate July's winners and Our Blog Hop challenge Winner!

The winner of Drill #11, is:
Karen
Photo (43)
Please contact us with your
mailing address to collect your Prize Pack.

The winner of Drill #12, is:
Jackie
Please contact us with your 
mailing address to collect your prize pack.

And the last but not least!
The winner of our first Blog Hop Challenge is:
Ruth
I really love parades and fireworks and getting together with family! And the Jesse White Tumblers are like the icing on the Fourth of July cake!
Please contact us with your
mailing address to collect your Prize Pack.


Thank you all again for sharing your amazing
talent with us! We hope that you had fun!
See You Saturday!!

Please contact us by email at: swatscrappygirl@gmail.com
All prizes must be claimed by August 15th