Wednesday, July 30, 2014

Hump Day July 30th

It's


Today we have design team member Venetia to share a bit of inspiration with us...

Happy Wednesday. I wanted to share a card made from found and borrowed objects. I was on vacation and I forgot supplies, so I used some creative recycling to make a card to send home. Happy Wednesday!!!


Thanks for stopping by today!!  See you soon!

Saturday, July 26, 2014

Special Ops: Fan Die

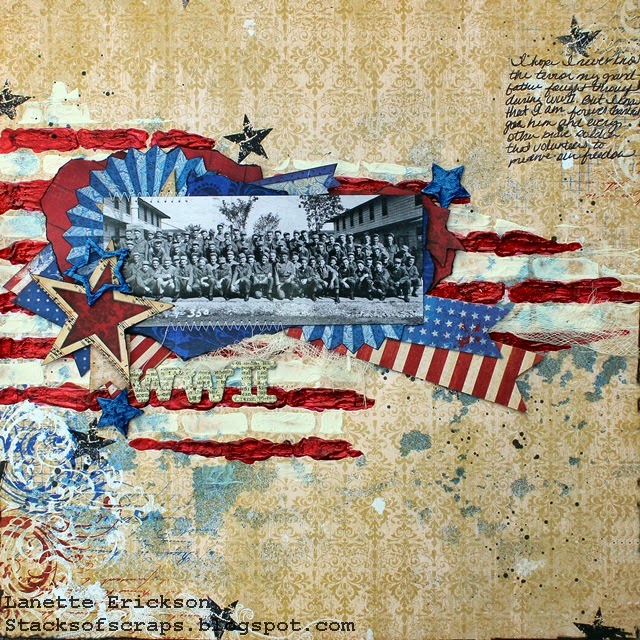
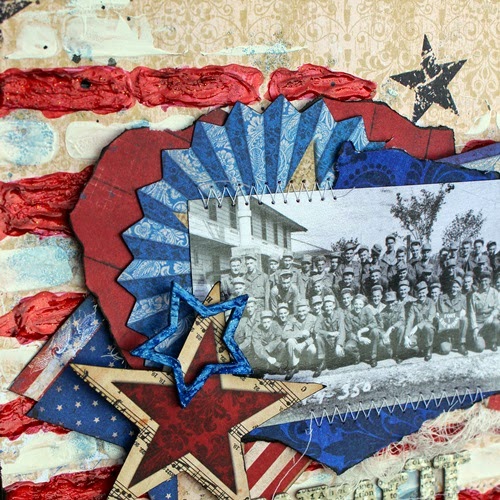
Just Imagine has a brand new fan die and I think you are going to just LOVE it!!! It's super easy to use and you can place the die exactly where you want it on the paper to highlight specific designs. Here's my first try at the fan die:
Fan (676x800)

Supplies:
2 pieces cardstock or patterned paper in contrasting colors
10 inches 1/2 inch ribbon for joining ribs
3/16 inch eyelet
decorative brad
assorted ribbons and charms for decoration

Step 1
Cut 8 fan ribs using large die.
Cut 7 fan ribs from contrasting color using small die.
Fan (4) (772x1000)

Step 2
Punch tops  of small fan ribs with Kreaxions corner punch. Use insert A and center rib on middle line so that only 1/8 inch of the long slit rests on the insert.
Fan (2) (700x700)

Step 3
Adhere tip of ribbon on to the front of the first large fan rib, to the side of the long slit. Adhere one small fan rib on top of the ribbon and large fan rib.
Step 4
Adhere remaining small fan ribs onto large fan ribs, lining up holes. There will be a single large fan rib left over.
Fan (3) (700x700)
Step 5
Stack all the fan ribs so that the first fan rib is on the bottom and the single large fan rib is on the top. Insert an eyelet into the hole at the tip of the fan ribs from the back. Add a decorative brad from the front to secure the tips.
Step 6
 Thread attached ribbon through back of first fan rib to the front of the single large rib.
Loop it over a second piece of ribbon and thread it back through the hole of the single large rib.  Tie second piece of ribbon into a bow.
Step 7
Spread fan along threaded ribbon until its edges barely overlap and the fan is open.
Attach threaded ribbon to the back of the single large rib, remove excess.
Step 8
Decorate fan with assorted charms and ribbons, hanging from decorative brad.
For this project I used the Just Imagine Fan Die, and Kreaxions 4-in-1 Punch #904.
Check my blog Scrappin Chaos for more fun ideas!
Scrap On!
~charity~

Wednesday, July 23, 2014

Hump Day


Hello all Lanette here! Recently I have been spending more time at my grandfathers house cleaning and such and let me tell you I have found some treasures! For example I found this picture of my grandfathers Platoon in September of 1944. So i just couldn't resist creating a layout all about him and his service during WWII. 

I started with some luscious Art Anthology Gesso and a brick stencil and this months sketch challenge over at Once Upon a Sketch. 


from there I started to build my tattered flag with some beautiful dimensional crystal.


I coated my little chipboard stars with some gesso while I was waiting for my flag to dry, just one coat an they were ready to rock some Honolulu Blue Sorbet.


With all my pieces ready my layout quickly fell together.


Products UsedArt Anthology -Gesso, Dimensional Crystal, Sorbet, Velvet & Colorations Mist. Bo Bunny- Anthem Collection Pattern Paper, American Crafts- Thickers, Umwow -Chipboard and a bit of cheesecloth. 

Now lets take a look at some details just for fun!


 Make sure you check out this months drills! 


After all there is a $25 Gift Card up for grabs this month!

Thank you for stopping by today!

Saturday, July 19, 2014

Drill #36 Home of the Brave


Drill #36
Home of the Brave -Mood Board


The rules are simple just create a project inspired by our mood board. Feel free to interpret the mood board in any way you like, using one image, several of them, all of them or even just one aspect of an image, using ANY Products & Colors you like. 

Now remember this month we Have an amazing sponsor! And one lucky winner will win a $25 Gift Card to shop at......
$25 Electronic Gift Certificate
Make sure you hop on over for tons of amazing inspiration challenges and lots of fabulous products!! 

Just check out these beautiful projects from the S.W.A.T. TEAM has created for your inspiration!


Venetia 

Claude

Lanette

Now it's your turn, just link up your project by 
July 31st for your chance to win a $25 Gift card to

*** There is only one prize for the month of July so both Drills will be entered in the same random prize drawing.

Thank you so much for stopping by today! 


Remember to come join us on our Facebook Page!

Wednesday, July 16, 2014

Hump Day July 16th

Guess What Day It Is Hump Day Camel Stickers
Yep!  It's hump day!!  Hope you have a happy one!!  
Michele here today to share what I made with the flower embellishments I posted for Basic Training Saturday (click here for details).
I used them for the centers of paper flowers that are attached to cute burlap gift bags.


I used Distress paint and a piece of punchinella as a stencil to add a bit of color to the bags.  The flowers are cut with the Tattered Flowers die from Tim Holtz.


Thanks for joining us here at SWAT on this fine Wednesday!!  I hope we have inspired you to create and of course make sure to check out the 2 drills we have going on this month; Christmas in July and a new Drill on July 19th.  The link ups are open until the end of the month.

Saturday, July 12, 2014

July Basic Training-Embossing Powder in Silicone Molds


Summer is in full swing and it seems like in the summer I use more flowers on my projects.  I was surfing the web the other day and came across a tutorial over at Amazing Craft Products that I found very intriguing (you can see it here).  They were using embossing powder in molds....I changed it up a bit and wanted to share it with you today.  I have had these silicone molds (Martha Stewart) for a LONG time and this was finally a perfect time to break them out!!  I started with flowers for this tutorial.


You will need a silicone mold, embossing powder and a heat gun.  I used my ranger gun because it doesn't blow air but I also tried my other heat gun and it can be used...you just have to start by heating from the bottom.


Fill your mold with powder, pat it down a little.


Start heating with your heat gun.


Once the embossing powder starts to melt then heat from the bottom.  I used tweezers so I wouldn't heat up my hand too.  :)  Once it looks all liquidy set it aside to cool COMPLETELY.


Once it is cool you can bend the mold so the shape pops up.


You will have to clean up the edges once you pop it out of the mold, be careful not to chip too much off,


Here are a couple of different sizes and colors.

Make sure to stop back Wednesday for hump day to see what I made with these fun and easy flower embellishments.

Thanks so much for sharing part of your day with us here at S.W.A.T.!  See you soon!!!
Michele

Saturday, July 5, 2014

Drill #35 Christmas in July

Drill #35

The rules are simple just create a non- Christmas themed project using a Christmas Collection!
So what can you win if you share your holiday sprit with us...

This month we Have an amazing sponsor! And one lucky winner will win a $25 Gift Card to shop at......
$25 Electronic Gift Certificate
Make sure you hop on over for tons of amazing inspiration challenges and lots of fabulous products!! 
Make sure you let them know who sent you :)

Now I know you are ready to start scrapping  away but before you do check out these beautiful projects from the S.W.A.T. TEAM!

Fancy Pants Merry Little Christmas


Echo Park Season's Greetings

Charity
My Mind's Eye All Is Bright
Now it's your turn, just link up your project by 
July 31st for your chance to win a $25 Gift card to

*** There is only one prize for the month of July so both Drills will be entered in the same random prize drawing.

Thank you so much for stopping by today! 


Remember to come join us on our Facebook Page!
   

Friday, July 4, 2014

and the Winner is........

It's time again to send out an awesome prize!!!

But before we do that we wanted to say Thank you all so much for playing along this month! All of your projects were beautiful and we are truly thankful that you shared your ART with us!!

NOW Back to the fun stuff!! This month we had one fabulous prize to share a $20 Gift Card to Creative Embellishments!


Our Random Draw Winner from all entries is:
From Drill #33 Entry number 5 Jessica 

http://scrapping2boys.blogspot.com/2014/06/show-us-your-selfie.html

 
Please contact us @: swatscrappygirl@gmail.com with your name and email by July 15th to claim your $20 Gift Card to Creative Embellishments

courtesy of the amazing ladies at Creative Embellishments!

See you in a few Hours for our next Drill!